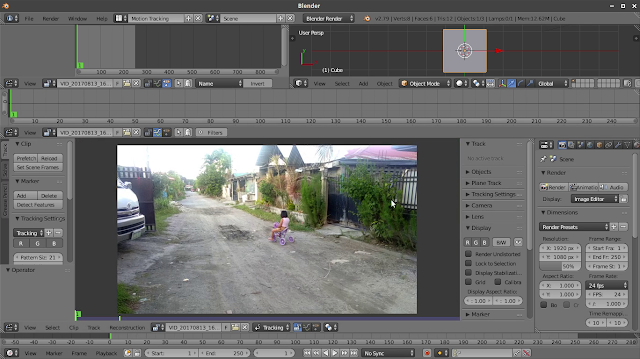
This is a written, more detailed version of the Quick Camera tracking tutorial in Blender.
For those, who found the video too fast. 😄😄😄
QUICK CAMERA TRACKING IN BLENDER
This is how I tracked the camera on "When you hum the Game of Thrones Theme" AVAV.
STEP 1. PREPARE OR SHOOT THE FOOTAGE
If you don't have a camera or just want to practice camera tracking without the hassle of shooting,
you can download the footage I used on the AVAV here:
But if you want to shoot your own footage, these are the things you need to take note of:
Camera movement
It should be minimal. Which means, no shakes, no major changes in camera angle,
movement not too fast and no zoom ins and outs.
List down your camera settings
Focal Length
Sensor Size
Frame Rate
STEP 2. START CAMERA TRACKING
 |
| Open up Blender and change the layout to Motion Tracking. |

Open the footage you want camera tracked.
Change the frame rate in Blender
equal to the frame rate of the raw footage.
(29.25 if you used the raw footage provided above)
This is important because if not set right,
despite the track appearing fine during tracking,
it messes up the track after solving.
 |
| After picking a frame, press "Detect Feature" on the Track panel. This will automatically plot out track points on the frame. |
 |
| After the tracking is done, expand the Graph Editor to clearly see the curves representation of each track. |
 |
| Examine the graph and look for a curve that is very different from the rest, select it and then delete it by pressing "X" and selecting "Delete Curve". |
 |
| After cleaning up the track, head over to the panel at the right side of the footage and look for the camera and lens settings. |
 |
| Set the focal length and sensor size equal to the camera's. You'll only be needing the width for the sensor size. (For the footage above, the Focal length is 2.94 and the Sensor Width is 3.6) |
 |
| After setting up the camera settings, go to the Solve Panel and press "Solve Camera Motion". |
 |
| This process will be done in a few milliseconds. It will give you a Solve Error information afterwards. For best results, the solve error should be less than 0.2. |
 |
| You can also tell Blender to refine some camera settings. (For the footage used, refining K1 and K2 did the trick) |
 |
| To set the scale, select TWO track points, preferably, that are close to each other. And press "Set Scale". |
 |
| Select ONE track point and press "Set Origin" to set the center of the 3D view. And you can also set the X-axis, if you want to. |
 |
| You can preview the Orientation from the 3D view on the upper corner of the Window. |
 |
| If you're satisfied with the Orientation, just go back to the Solve Panel, head over the Scene Setup option and press "Setup Tracking Scene". |
AND THAT'S IT!
That's how I tracked and plan to track my cameras for my AVAV videos. If I need to do it quickly. :)
If you have any questions, don't hesitate to ask them on the comments below!
That's how I tracked and plan to track my cameras for my AVAV videos. If I need to do it quickly. :)
If you have any questions, don't hesitate to ask them on the comments below!


No problem! :)
ReplyDelete